Getting adhesive viscosity spray gun selection wrong doesn’t just waste material it wastes time, clogs equipment, and produces results that would embarrass a first-year apprentice. I’ve seen perfectly good spray guns turned into expensive paperweights because someone grabbed the wrong fluid tip for the job. So let’s fix that.
Adhesive viscosity measured in centipoise (cPs) directly determines your fluid tip size, gun type, atomization pressure, and fluid supply method. Low-viscosity adhesives spray through smaller tips (1.0–1.4 mm) at lower pressures. High-viscosity adhesives demand larger tips (1.8–2.5 mm+), higher air pressure, and often a pressure pot or pump system. Match the gun to the material first. Adjust pressure second. Everything else follows.
Viscosity is the measurement of a fluid’s resistance to flow, and it’s typically measured in centipoise (cPs) one hundredth of a poise.
Think of it as the difference between water and cold honey. One flows effortlessly through almost any orifice. The other does not. Adhesives span a staggering range of that spectrum.
Viscosity is a measure of a fluid’s resistance to shear stress an approximate measure of the “thickness” of a liquid.
And in spray applications, thickness dictates everything: tip size, air pressure, gun type, and supply method. Skip this step, and you’re essentially guessing.
Viscosity measurements help you understand the size of needle and nozzle required to effectively atomize your finish.
I always tell people: measure your adhesive viscosity before you touch the spray gun. Not after. Not during. Before.
You’ll need your adhesive, a viscosity cup, and a stopwatch. The most common viscosity cup sizes are the #4 Ford or the #2 Zahn.
Viscosity is measured by submerging the cup into your material, then removing it to see how long it takes to pass through the orifice at the bottom.
The result, in seconds, maps to a centipoise value on a conversion chart. Simple, fast, and actually scientific unlike judging thickness by watching it drip off a screwdriver.
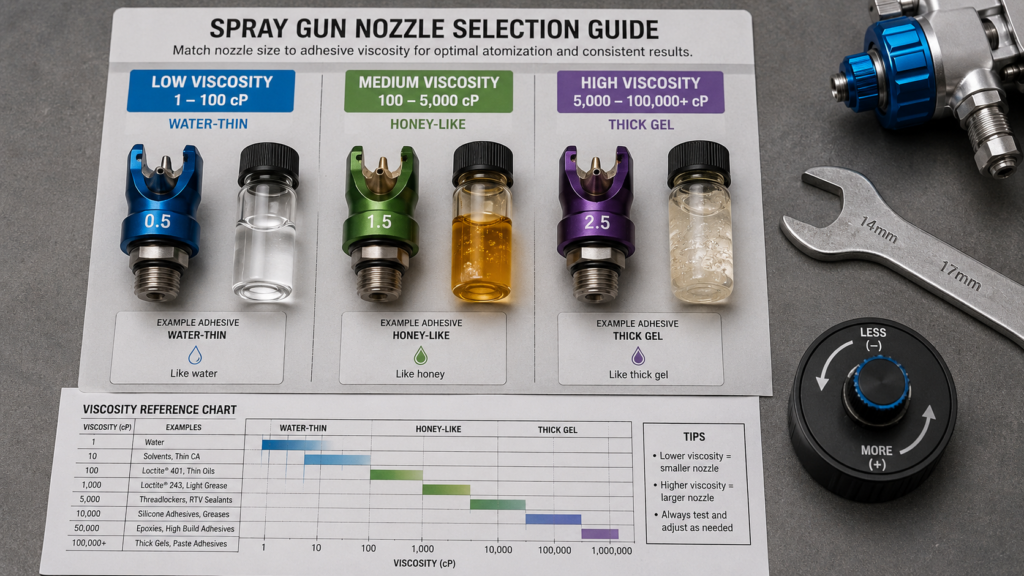
Tip size determines the maximum viscosity of the adhesive that can be effectively atomized. Simply put, thicker materials require larger tips for proper flow.
This is non-negotiable physics. You can’t out-pressure a mis-sized tip.
Here’s how the sizing ladder works in practice:
Nozzles between 0.8 mm and 1.1 mm are commonly used for low-viscosity materials, including stains, dyes, thin sealers, and light clear coats ideal when precision matters more than speed.
For thin contact adhesives and diluted solvent-based formulations, this range is your territory.
Nozzles from 1.7 mm up to 2.5 mm are designed for thicker materials such as primers, fillers, and heavy industrial coatings. These materials would struggle to flow through smaller openings, and using a nozzle that is too small for thick material often results in clogging and inconsistent spray patterns.
For industrial adhesives specifically, the calculus shifts further.
Since water-based adhesives are more viscous in general, you typically need a larger fluid nozzle than you use with solvent-based adhesives.
And high-viscosity materials flow slowly and require a large orifice and high fluid pressure to obtain the necessary flow rates, while lower-viscosity fluids require smaller openings and less pressure for optimum performance.
A quick rule of thumb I use: when in doubt, size up on the tip rather than down. You can dial back pressure. You can’t push honey through a pinhole.
Since adhesives are more viscous and shear differently than most other liquids commonly sprayed, you need a conventional spray gun or one specifically designed for adhesives. A conventional spray gun will be most effective at atomizing glue. If you try another technology like HVLP or LVLP, you may not be able to adequately break the glue apart or achieve the desired pattern for spraying.
That said, gun selection also depends on the viscosity range and production volume.
There are three main types of spray formation: air-assisted, hydraulic, and ultrasonic.
Low-viscosity adhesives atomize easily with all spray methods but may require faster substrate movement or adjusted standoff distances to prevent running or pooling. Medium-viscosity adhesives represent the sweet spot for most spray systems and offer good control over layer thickness and coverage. High-viscosity adhesives require high-pressure hydraulic spray systems or heated air-assisted systems to achieve adequate atomization.
Some adhesives punish hesitation.
If your adhesive has two components that result in an instantaneous or near-instantaneous bond, you’ll need a plural component application system, which keeps the two components separate and mixes them at the tip of the spray gun eliminating the risk of premature hardening and ruined equipment.
Don’t learn this lesson the expensive way.
Three key operational parameters govern adhesive atomization: air pressure, which determines kinetic energy and shear forces for liquid sheet breakup; glue pressure, which controls adhesive flow rate; and fluid viscosity, which characterizes the intrinsic resistance to flow and deformation.
In practical terms, coating materials with higher thickness require greater air atomizing pressure or pump pressure, like when using air-assisted airless or airless equipment.
But more pressure isn’t always better.
Once you get a good fluid stream, slowly increase air until you get good atomization. More air than necessary will produce excessive overspray; too little and it will orange peel.
For a starting-point reference: ballpark fluid pressure of 8–10 PSI and air pressure of 30–50 PSI is a reasonable baseline for mid-range viscosity adhesives.
Exact settings will vary depending on the gun, tip size, and fluid viscosity.
Treat manufacturer charts as a neighborhood, not a GPS coordinate.
Here’s something operators routinely overlook.
The viscosity of a fluid will tend to lessen as it is heated. Conversely, if certain liquids cool, they will become more viscous.
A few degrees in temperature difference can mean the difference between a 1,000 cPs fluid (not really practical for spraying) and a 100 cPs fluid which is able to be sprayed.
Most coatings are formulated to be sprayed at 73°F to 77°F (21°C to 25°C). Check the viscosity and spray in this temperature range.
In production environments with high-viscosity hot-melt or reactive adhesives, heated water jackets are often used to maintain a stable fluid temperature right up to the nozzle orifice.
The spray gun is only half the equation. Getting thick adhesive to the gun consistently is the other half.
If you’re applying adhesives in high volume like from a 5- or 55-gallon supply you’ll typically want to consider a double diaphragm pump. The advantage of a transfer pump is the ability to push material at increased pressure, which can be needed when spraying higher-viscosity adhesives.
For smaller-scale work, you can use a basic pressure pot system. If you’re spraying waterborne adhesives, consider a stainless steel pressure pot to avoid significant rusting.
And for solvent-based formulations, a standard galvanized tank typically does the job.
Here’s how viscosity range maps to equipment setup:
Most good spray gun manufacturers offer a chart that helps you determine how your spray gun air cap assembly should be configured based on the type and viscosity of the coating being applied. These charts are good starting points, but they leave room for adjusting and fine-tuning your finishing performance.
Under-atomized paint often caused by using too large a tip may land too wet and result in poor adhesion. Over-atomized material from too small a tip might dry before reaching the surface, reducing bond strength.
With too-small a tip and high-viscosity adhesive, you’ll also see clogging, spitting, and an inconsistent spray pattern that’s impossible to control.
Since adhesives shear differently than most other sprayed liquids, you need a conventional gun or one specifically designed for adhesives. With HVLP or LVLP technology, you may not be able to adequately break the glue apart or achieve the desired spray pattern.
For light-bodied adhesives this may be workable, but for anything medium-viscosity and above, a conventional gun is the safer bet.
Obtaining a uniform finish with highly viscous fluids depends on the spray system setup. Knowing the viscosity measurements and your spray gun’s abilities are important to get a great finish.
Practically speaking, run a test pattern on cardboard. A properly atomized adhesive produces a smooth, even elliptical fan with no tails, no dry mist edges, and no wet spots at the center. If you see tails, add air. If you see splattering, dial back fluid pressure and increase tip size.
Adhesive viscosity spray gun selection isn’t complicated but it does demand respect for the process. Measure viscosity first. Match your fluid tip to the cPs range. Choose the right gun type. Then dial in atomization pressure with test passes rather than guesswork. And always, always account for temperature before you blame the equipment.
Selecting the right nozzle is not guesswork. It is a technical decision that directly impacts efficiency, finish quality, and overall project cost.
If you’re setting up a new adhesive spray line or troubleshooting an existing one, pull the product data sheet for your adhesive, grab a viscosity cup, and match the numbers to the equipment. It takes twenty minutes. It saves hours of rework.
Ready to optimize your adhesive spray setup? Review your current fluid tip sizes against the viscosity ranges above, and if your equipment doesn’t match your material, change the equipment not your expectations.